
After launching your Minimum Viable Product (MVP), it’s quite likely that customer uptake won’t be immediate. It should be expected:
Your MVP is the minimum feature set that lets you start learning about customers.
When you first launch a product, many things can and do go wrong. But when that happens, a typical reaction is to want to build more stuff — especially when it comes disguised as a customer feature request.
While listening to customers is key, you have to know how.
Blindly pushing features is rarely the answer. Features have costs that go beyond building costs, such as ongoing maintenance, documentation, added complexity, etc. Because unused features are a form of waste, it’s important only to keep those features that have a positive impact on your key metrics. Otherwise, left unchecked, it’s very easy to undo all the painstaking effort you put into reducing the scope of your MVP in the first place.
Even though all this makes logical sense, managing features in practice is still quite hard. I wrote a post on a similar topic a year ago titled: “3 Rules for Building Features” which represented some early thoughts on how to do this.
In this post, I’m going to build on that foundation and outline what our current process looks like.
Visualizing the Feature Lifecycle
Features versus bug fixes
The first step is distinguishing between features and bug fixes. By feature, I mean a Minimal Marketable Feature (MMF).
MMF was first defined in the book “Software by Numbers”: as the smallest portion of work that provides value to customers. An MVP is made up of one or more MMFs.
A good test for an MMF is to ask if you’d announce it to your customers in a blog post or newsletter. If it’s too tiny to mention, it’s not an MMF.
Features as iterations
Next, we build and track features independent of release or traditional iteration boundaries.
Time-boxed iterations are used in a typical Agile Software Development process to define release boundaries. Still, the problem starts when features over-run this boundary which is fairly common — especially when you additionally want to track the longer-term effects of features. Having implemented 2-week release cycles for several years and then switched to Continuous Deployment, I find it unnecessary to take on the added overhead of tracking features this way.
Instead, we track every feature as its iteration. Rather than focus on velocity and planning games, we track end-to-end cycle time on features. We use Continuous Deployment to incrementally build and deploy features and a single Kanban board to visualize the feature lifecycle, which I’ll describe next.
Meet our Kanban board
For those unfamiliar with Kanban, it is a scheduling system designed by Taiichi Ohno, father of the Toyota Production System, and is a way to visualize the flow of work. It has more recently been adapted for software.
A Kanban board is to feature tracking what a Conversion Dashboard is to metrics tracking. Both let you focus on the Macro.
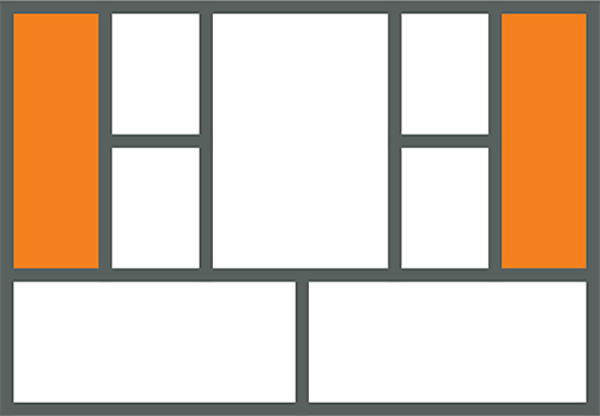
We extend the basic Kanban board by adding several sub-states, shown below:
LEGEND
1: We clearly state the current macro metric we want to achieve at the top, which helps prioritize what we work on.
2: We add an explicit state for validated learning.
3: We constrain the number of features we work on based on the number of developers. This prevents us from taking on new features without first validating that the features we just pushed were good.
4 and 5: The top row is for stuff currently being worked on, while the bottom row is for work ready to move to the next stage. This will become clearer in a moment.
6: The green stages are where we solicit customer feedback.
The basic idea is that features start on the left-hand side of the board and move through stages of product and customer development before they are considered “Done.” In a Lean Startup, a feature is only done after its impact on customers has been measured.
Processing Feature Requests
I mentioned that we treat features differently from bug fixes. Here’s a “Getting Things Done” (GTD) style workflow for how we process new work requests that come in either internally or via customers:
Bug fixes either get fixed and deployed immediately or go on our task board. All features requests end up on our Kanban board, where they are then processed using a 4-stage iteration process that I’ll walk through next:
1. Understand Problem
The first stage begins with a weekly prioritization of backlog items waiting to be worked on based on the macro metric we’re currently trying to improve. So, for instance, if we have serious problems with our sign-up flow, all other downstream requests take a backseat to that.
We pick the highest priority feature in the list, and we first set up a few customer interviews to understand the underlying problem behind the feature request. Not what the customer wants, but why they want it. Every feature starts with a “NO” and needs value justification to be deemed “worth building” before we commit to building it.
After these interviews, the feature is either killed or moved to the next stage.
2. Define Solution
Once we understand the problem, we then define the solution, starting with just the screens we demo to these same customers. This usually results in a few design iterations that help define the solution we need to build.
3. Validate Qualitatively
Once we know what to build, we start building the rest of the features using a continuous deployment process. Continuous Deployment combined with a feature flipper system allows us to push these features to production but keep them hidden from customers until we are ready. When the feature is code complete, we do a partial rollout to select customers and validate the feature qualitatively with them. If we surface any major issues, we go back to address them.
4. Verify Quantitatively
Once the feature passes qualitative validation, we roll it out to everyone and start gathering quantitative metrics. Because quantitative metrics can take time to collect, we start work immediately on the next high-priority feature from the backlog. Splitting the validated learning stage into 2 phases (first qualitative, then quantitative) allows us to balance speed and learning properly.
It stays in the app if the feature positively impacts the macro metric within a reasonable time window. Otherwise, it is killed and removed.
See the Full Presentation
Tools We Use
Here are the tools we use to implement this product development system:
1. AgileZen for our Kanban board.
2. heroku for continuous deployment.
3. github for source code management.
4. Jenkins for continuous integration.
5. rollout for our feature flipper system.
6. Vanity for split testing.
7. Hipchat for tying all the above together through persistent chat rooms and notifications.
Go Only As Fast As You Can Learn
Since the goal of a startup is finding a plan that works before running out of resources, we know that speed is important. But it’s not an excuse for turning into a feature pusher. You must balance speed with learning by building a continuous feedback loop with customers — not just at the tail ends but throughout the product development cycle.